The first RCArduino project for the Arduino Due is the Quick And Dirty Synth. The synth is a simple showcase for audio output through the DAC running at the Audio CD sample rate of 44.1Khz.

RCArduino Quick And Dirty Synth by RCArduino is licensed under a
Creative Commons Attribution 3.0 Unported License.
Based on a work at rcarduino.blogspot.com.
The showcase is based on the simplest synth engine I could create - 3 counters counting up at a rate controlled by three analog inputs.
It might sound simple but its a surprisingly rich sounding synth engine, here is how it works -
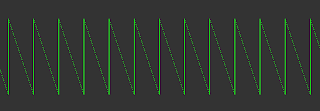
Two of the counters generate ramp waveforms - think about it, they are counting up from 0 to 4095, when they overflow, they go back to 0 and start the count again.
Example Ramp Output -

Example Ramp At A Higher Frequency -
These ramp waveforms are summed together at the output to generate a more complex waveform - two ramp waves of independent frequency superimposed on each other.
Example - Two triangle at frequency F and 3F mixed together to create a new output waveform.
 The third ramp waveform is used to control the pitch. It is not mixed with the output waveforms instead it achieves pitch control by resetting the first two waveforms.
Output waveform reset at frequency determined by third counter - notice that the counter is not directly present in the output but controls the repetition/synchronization of the output which in turn creates the pitch.

To hear the technique in action connect three potentiometers to your Arduino Due on analog inputs 0,1,2 and an audio amplifier to DAC0.
All of the Audio projects on RCArduino use the following simple amplifier circuit -
http://rcarduino.blogspot.com/2012/08/adding-audio-to-arduino-projects.html
To learn more about the synthesis technique used in the quick and dirty synthesizer see the following link -
http://rcarduino.blogspot.com/2012/08/adding-audio-to-arduino-projects.html
The code
Caution : The SAM3X8E microcontroller at the heart of the Arduino Due is less able to sink and source current than the AVR family of chips used in the 8-Bit Arduinos. I would suggest using a series resistor of around 500 Ohms when connecting the Arduino Due DAC to an external device. See this thread on the Arduino forum for more information - http://arduino.cc/forum/index.php/topic,139733.0.html
RCArduino Quick And Dirty Synth by RCArduino is licensed under a
Creative Commons Attribution 3.0 Unported License.
Based on a work at rcarduino.blogspot.com.
The showcase is based on the simplest synth engine I could create - 3 counters counting up at a rate controlled by three analog inputs.
It might sound simple but its a surprisingly rich sounding synth engine, here is how it works -
Two of the counters generate ramp waveforms - think about it, they are counting up from 0 to 4095, when they overflow, they go back to 0 and start the count again.
Example Ramp Output -

Example Ramp At A Higher Frequency -

These ramp waveforms are summed together at the output to generate a more complex waveform - two ramp waves of independent frequency superimposed on each other.
Example - Two triangle at frequency F and 3F mixed together to create a new output waveform.

Output waveform reset at frequency determined by third counter - notice that the counter is not directly present in the output but controls the repetition/synchronization of the output which in turn creates the pitch.

To hear the technique in action connect three potentiometers to your Arduino Due on analog inputs 0,1,2 and an audio amplifier to DAC0.
All of the Audio projects on RCArduino use the following simple amplifier circuit -
http://rcarduino.blogspot.com/2012/08/adding-audio-to-arduino-projects.html
To learn more about the synthesis technique used in the quick and dirty synthesizer see the following link -
http://rcarduino.blogspot.com/2012/08/adding-audio-to-arduino-projects.html
The code
Caution : The SAM3X8E microcontroller at the heart of the Arduino Due is less able to sink and source current than the AVR family of chips used in the 8-Bit Arduinos. I would suggest using a series resistor of around 500 Ohms when connecting the Arduino Due DAC to an external device. See this thread on the Arduino forum for more information - http://arduino.cc/forum/index.php/topic,139733.0.html
// RCArduino Quick And Dirty Synth for Arduino Due// RCArduino Quick And Dirty Synth by RCArduino is licensed under a Creative Commons Attribution 3.0 Unported License.
// Based on a work at rcarduino.blogspot.com.
// For helpful background information on Arduino Due Timer Configuration, refer to the following link
// thanks to Sebastian Vik
// http://arduino.cc/forum/index.php?action=post;topic=130423.15;num_replies=20
// The following folders within the arduino install provide access to source code and documentation
// its very low level, the documentation is next to useless, but it might help someone
// C:\arduino-1.5.1r2\hardware\arduino\sam\system\libsam\source
// C:/arduino-1.5.1r2/hardware/arduino/sam/system/CMSIS/Device/ATMEL/sam3xa/html/tc1.html
// C:/arduino-1.5.1r2/hardware/arduino/sam/system/CMSIS/Device/ATMEL/sam3xa/html/SAM3XA.html
// C:\arduino-1.5.1r2\hardware\arduino\sam\system\CMSIS\CMSIS\Documentation
// These are the clock frequencies available to the timers /2,/8,/32,/128
// 84Mhz/2 = 42.000 MHz
// 84Mhz/8 = 10.500 MHz
// 84Mhz/32 = 2.625 MHz
// 84Mhz/128 = 656.250 KHz
//
// 44.1Khz = CD Sample Rate
// Lets aim for as close to the CD Sample Rate as we can get -
//
// 42Mhz/44.1Khz = 952.38
// 10.5Mhz/44.1Khz = 238.09 // best fit divide by 8 = TIMER_CLOCK2 and 238 ticks per sample
// 2.625Hmz/44.1Khz = 59.5
// 656Khz/44.1Khz = 14.88
// 84Mhz/44.1Khz = 1904 instructions per tick
// These variables represent our synth engine, its similar to a vastly simplified Auduino and has a similar sound.
// Phase Accumulator controls the main pitch, grain1 and grain two phase accumulator control the pitch for the two grains
// The grainPhaseAccumulators are essentially simple counters, when you count up and overflow back to 0, you generate a ramp waveform
// we generate two and mix them together.
uint32_t ulPhaseAccumulator = 0; // 32 bit phase accumulator, if we shift >> 20 bits we get a 12 bit value for our output ADC
volatile uint32_t ulPhaseIncrement = 0; // 32 bit phase increment, see below
uint32_t ulGrain1PhaseAccumulator = 0; // 32 bit phase accumulator, if we shift >> 20 bits we get a 12 bit value for our output ADC
volatile uint32_t ulGrain1PhaseIncrement = 0; // 32 bit phase increment, see below
uint32_t ulGrain2PhaseAccumulator = 0; // 32 bit phase accumulator, if we shift >> 20 bits we get a 12 bit value for our output ADC
volatile uint32_t ulGrain2PhaseIncrement = 0; // 32 bit phase increment, see below
// full waveform = 0 to 4294967296
// Phase Increment for 1 Hz =(4294967296/44100) = 1Hz
// Phase Increment for frequency F = (4294967296/44100)*F
#define SAMPLE_RATE 44100.0
#define TICKS_PER_CYCLE (4294967296.0/SAMPLE_RATE)
// Create a table to hold the phase increments we need to generate midi note frequencies at our 44.1Khz sample rate
#define MIDI_NOTES 128
uint32_t nMidiPhaseIncrement[MIDI_NOTES];
void createNoteTable(float fSampleRate)
{
for(uint32_t unMidiNote = 0;unMidiNote < MIDI_NOTES;unMidiNote++)
{
// Correct calculation for frequency
Serial.print(unMidiNote);
Serial.print(" ");
float fFrequency = ((pow(2.0,(unMidiNote-69.0)/12.0)) * 440.0);
Serial.print(fFrequency);
Serial.print(" ");
nMidiPhaseIncrement[unMidiNote] = fFrequency*TICKS_PER_CYCLE;
Serial.println(nMidiPhaseIncrement[unMidiNote]);
}
}
void setup()
{
Serial.begin(9600);
createNoteTable(SAMPLE_RATE);
/* turn on the timer clock in the power management controller */
pmc_set_writeprotect(false);
pmc_enable_periph_clk(ID_TC4);
/* we want wavesel 01 with RC */
TC_Configure(/* clock */TC1,/* channel */1, TC_CMR_WAVE | TC_CMR_WAVSEL_UP_RC | TC_CMR_TCCLKS_TIMER_CLOCK2);
TC_SetRC(TC1, 1, 238); // sets <> 44.1 Khz interrupt rate
TC_Start(TC1, 1);
// enable timer interrupts on the timer
TC1->TC_CHANNEL[1].TC_IER=TC_IER_CPCS;
TC1->TC_CHANNEL[1].TC_IDR=~TC_IER_CPCS;
/* Enable the interrupt in the nested vector interrupt controller */
/* TC4_IRQn where 4 is the timer number * timer channels (3) + the channel number (=(1*3)+1) for timer1 channel1 */
NVIC_EnableIRQ(TC4_IRQn);
// this is a cheat - enable the DAC
analogWrite(DAC0,0);
}
void loop()
{
// read analog input 0 drop the range from 0-1024 to 0-127 with a right shift 3 places,
// then look up the phaseIncrement required to generate the note in our nMidiPhaseIncrement table
uint32_t ulInput = analogRead(0);
ulPhaseIncrement = nMidiPhaseIncrement[ulInput>>3];
// set the phase increment for grains 1 and 2, we do not want a precise frequency for these,
// they set the character of the note rather than pitch
ulGrain1PhaseIncrement = analogRead(1)<<18;
ulGrain2PhaseIncrement = analogRead(2)<<18;
}
void TC4_Handler()
{
// We need to get the status to clear it and allow the interrupt to fire again
TC_GetStatus(TC1, 1);
ulPhaseAccumulator += ulPhaseIncrement; // 32 bit phase increment, see below
// if the phase accumulator over flows - we have been through one cycle at the current pitch,
// now we need to reset the grains ready for our next cycle
if(ulPhaseAccumulator < ulPhaseIncrement)
{
ulGrain1PhaseAccumulator = 0;
ulGrain2PhaseAccumulator = 0;
}
else
{
// increment the grains
ulGrain1PhaseAccumulator += ulGrain1PhaseIncrement;
ulGrain2PhaseAccumulator += ulGrain2PhaseIncrement;
}
// mix the grains by adding them together - to the result of adding these two 32bit values into the 12 bit ADC Output
// we shift both values right 21 places to sum two 11 bit values giving a 12 bit result.
uint32_t ulOutput = (ulGrain1PhaseAccumulator>>21)+(ulGrain2PhaseAccumulator>>21);
// we cheated and user analogWrite to enable the dac, but here we want to be fast so
// write directly
dacc_write_conversion_data(DACC_INTERFACE, ulOutput);
}
No comments:
Post a Comment