The latest version of the lap timer includes two new features -
1) External Audio - There is now an option to use a very simple amplifier circuit which is small enough to fit inside most project boxes. This will give you a lot more volume when you are using the system outdoors.
2) Countdown - With countdown switched on, the lap timer will beep to count down the last few seconds of the current lap time - it adds a little extra pressure - to beat the lap you have to beat the beeps.
For previous steps of the build along see the project index page -
http://rcarduino.blogspot.com/p/project-index.html
Before we get to the build, here are some user pictures of current builds, if you have pictures of your own build I am happy to share them.

Lap Timer Piezo Buzzer and External Audio
One of the most useful features of the lap timer is instant audio feedback, this is particularly important with RC Car racing and Kart racing where corners are fractions of a second apart and checking a display is not an option.
The feedback is deliberately simple but totally effective - one beep to confirm a lap and two beeps if its a new best lap.
To add the audio features we have two options
1) A Piezo Buzzer
2) An External Speaker
I have found it useful to have both options in my build, using the quieter peizo for testing near my home and the external audio to overcome the additional noise at the track, the latest code includes a menu to switch between these two output options.
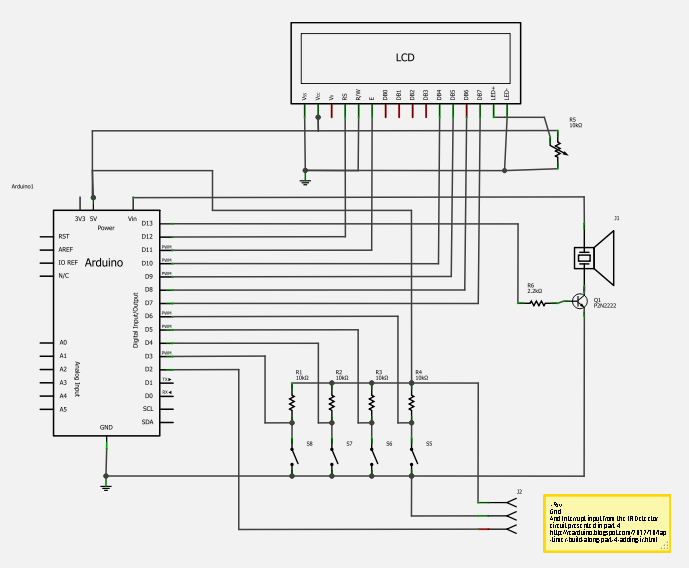
 Piezo With Transistor Driver
To get as much volume as possible from the buzzer we can drive it using the battery voltage rather than the regulated 5 volts from the Arduino. To switch the higher battery voltage from an Arduino pin we use a NPN transistor connected between the piezo (the load) and ground. This arrangement allows us to switch the higher voltages and currents through the Peizo and can also be applied to other loads such as high powered LEDs, relays and other components you may want to use in your future projects.
Components
1 * 2.2K Resistor
1 * P2N2222 Transistor
1 * Piezo Buzzer
External Audio Through A Speaker
The Peizo option can be used without adding the external audio option, but if you want more volume in your build read on -
In order to power a speaker we need a few more components to drive the extra current, one easy to use option is the LM386 Audio Amp chip. This is used extensively throughout the RCArduino blog in a variety of audio projects, full details and videos of the chip in action cab be found here -
http://rcarduino.blogspot.com/2012/08/adding-audio-to-arduino-projects.html
The LM386 Audio Amp can be build to a very compact form factor to fit your chosen enclosure -
 Parts List
1 x LM386-N4
2 x 100uf Electrolytic Capacitors
1 x 0.1uf Capacitor
1 x 100Ohm Resistor
1 x 10K Potentiometer1 x Phono socket for speaker connection
Schematic - Note the audio output is from analog pin 5, for simplicity only the audio components are shown, as there
 For the latest code, contact me Duane B though the Arduino forum.
Future Developments
Some common requests that I will be adding in the near future are -
1) Support for individual transponders - this will take some experimenting, but it should be possible to create a simple transponder scheme which will allow several lap timers to be used simultaneously with each car paired to a specific lap timer.
2) Support for magnetic transponders - I am told that many kart tracks use a magnetic strip under the track to activate transponders which are similar to magnetic window sensors, I hope to work with an Arduino forum user to add support for this option, it should be simple, but I have nowhere to test the system locally.
Inspired by Howie314's use of an off the shelf LCD Shield I will also add support for a build along based on this quick start option.
If you have a build you want to share, please submit some pictures,
Stay Tuned
Duane B
1) External Audio - There is now an option to use a very simple amplifier circuit which is small enough to fit inside most project boxes. This will give you a lot more volume when you are using the system outdoors.
2) Countdown - With countdown switched on, the lap timer will beep to count down the last few seconds of the current lap time - it adds a little extra pressure - to beat the lap you have to beat the beeps.
For previous steps of the build along see the project index page -
http://rcarduino.blogspot.com/p/project-index.html
Before we get to the build, here are some user pictures of current builds, if you have pictures of your own build I am happy to share them.
ALLY - Transponder mounted in touring car chassis

| Howie314 - Using an LCD Shield for a fast build | |
 | This build by Arduino Forum User Howie314 uses a LCD Keypad Shield, it keeps the size down and means there is very little soldering required to build the project. Many LCD Shields are available and all work in a similar manner meaning that you can get a lap timer up and running quickly with almost no soldering required. If someone would design an LCD Shield with a rotary encoder as well as buttons we could have the perfect lap timer interface. |
 | Howie314 is one of the first using the most recent version of the code with the new options of external audio and countdown. Additional options that I am considering in the near future are 1) Window magnet transponders and 2) AIM Transponders. See the end of post for more details. |
 | Howie also did some work on the user interface as the LCD Shield uses a single analog pin to read multiple buttons. It makes sense to offer a version of the build along based on these readily available shields so I will be taking a look at Howies modifications with a plan to offer a single version of the project which can be run on standalone builds or LCD Shields - props to Howie. |
ALLY's Build and Enclosure | Arduino forum user ALLY has used a standalone LCD and soldered his own buttons. This gives a bit more flexibility in the type of display and enclosures you can use, but also requires more work to build. |
| ALLY Transponder Mount | Here is a shot of ALLY's transponder mounted in his RC Touring car. Notice that the IR Emitter is mounted on a small post, this is a nice solution as the LED is well away from any areas that would impact in a crash. If you want to try something similar make sure to keep the wires to the LED short. I tried wires of about 15 cm which unfortunately acted as an antenna causing radio interference. |
ALLY's Carbon | ALLY has used a large carbon fibre effect enclosure, there is lots of room to add indicator LEDs, or one of my favorite features - a small amplifier for optional external speakers. |
One of the most useful features of the lap timer is instant audio feedback, this is particularly important with RC Car racing and Kart racing where corners are fractions of a second apart and checking a display is not an option.
The feedback is deliberately simple but totally effective - one beep to confirm a lap and two beeps if its a new best lap.
To add the audio features we have two options
1) A Piezo Buzzer
2) An External Speaker
I have found it useful to have both options in my build, using the quieter peizo for testing near my home and the external audio to overcome the additional noise at the track, the latest code includes a menu to switch between these two output options.
 Piezo With Transistor Driver
To get as much volume as possible from the buzzer we can drive it using the battery voltage rather than the regulated 5 volts from the Arduino. To switch the higher battery voltage from an Arduino pin we use a NPN transistor connected between the piezo (the load) and ground. This arrangement allows us to switch the higher voltages and currents through the Peizo and can also be applied to other loads such as high powered LEDs, relays and other components you may want to use in your future projects.
Components
1 * 2.2K Resistor
1 * P2N2222 Transistor
1 * Piezo Buzzer
External Audio Through A Speaker
The Peizo option can be used without adding the external audio option, but if you want more volume in your build read on -
In order to power a speaker we need a few more components to drive the extra current, one easy to use option is the LM386 Audio Amp chip. This is used extensively throughout the RCArduino blog in a variety of audio projects, full details and videos of the chip in action cab be found here -
http://rcarduino.blogspot.com/2012/08/adding-audio-to-arduino-projects.html
The LM386 Audio Amp can be build to a very compact form factor to fit your chosen enclosure -

1 x LM386-N4
2 x 100uf Electrolytic Capacitors
1 x 0.1uf Capacitor
1 x 100Ohm Resistor
1 x 10K Potentiometer1 x Phono socket for speaker connection
Schematic - Note the audio output is from analog pin 5, for simplicity only the audio components are shown, as there

Future Developments
Some common requests that I will be adding in the near future are -
1) Support for individual transponders - this will take some experimenting, but it should be possible to create a simple transponder scheme which will allow several lap timers to be used simultaneously with each car paired to a specific lap timer.
2) Support for magnetic transponders - I am told that many kart tracks use a magnetic strip under the track to activate transponders which are similar to magnetic window sensors, I hope to work with an Arduino forum user to add support for this option, it should be simple, but I have nowhere to test the system locally.
Inspired by Howie314's use of an off the shelf LCD Shield I will also add support for a build along based on this quick start option.
If you have a build you want to share, please submit some pictures,
Stay Tuned
Duane B
No comments:
Post a Comment