This is part 4 of my tutorial on designing an Android Phone Bluetooth App using the Android/Processing language. The App sends information to an Arduino via Bluetooth after pressing a button on the phone. The RGB LED attached to the Arduino Uno (or compatible board) will change colour depending on the button being pressed on the phone. The Arduino gains Bluetooth capabilities through the Seeedstudio Bluetooth shield (which can be found here).
Parts 1-3 of the tutorial were designed to take you step-by-step through designing the app. If you are wondering what you missed, here is a summary:
In Part 4, we simplify and strip down the App so that it will only sends a specific String to the Arduino via Bluetooth. The String sent to the Arduino depends on the Button being pressed. The code has been cleaned up and has many comments to help you understand what is going on. You should be able to run this sketch without having to go back through parts one, two or three of the tutorial. This fourth part of the tutorial was designed for those people who want the final end product, and are happy to work it out for themselves. I hope this serves you well. I will therefore assume that you have already setup your phone and have downloaded all the neccesary drivers, libraries, SDKs and IDEs. If not, then here are a few quick links:
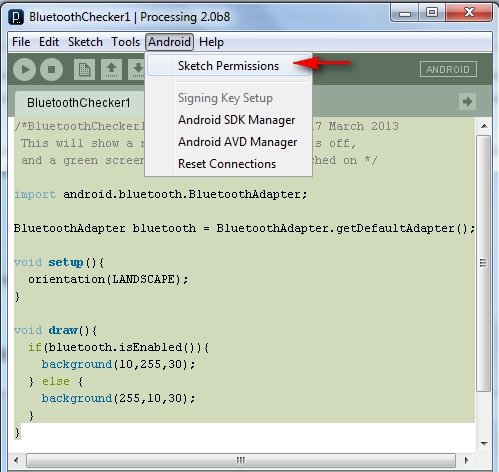
If you are a bit lost and want want a bit more information then please go through parts one, two and three of this tutorial. Make sure that you have selected the Bluetooth permissions as per the following:
Android > Sketch permissions (as per the picture below)
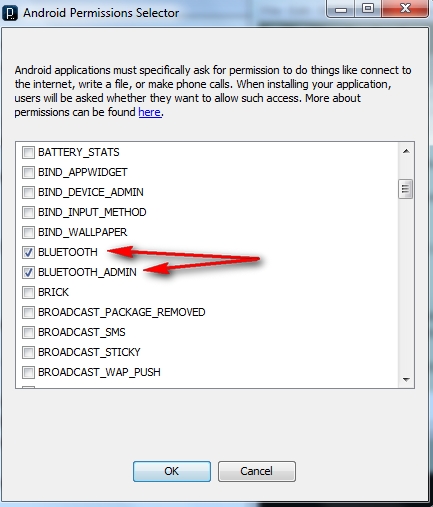
Make sure that BLUETOOTH and BLUETOOTH_ADMIN are selected (as per the picture below). Then press the OK button.
Then copy and paste the following sketch into the processing/android IDE:
/* BluetoothApp2: Written by ScottC on 1st April 2013 using Processing version 2.0b8 Tested on a Samsung Galaxy SII, with Android version 2.3.4 Android ADK - API 10 SDK platform Apwidgets version: r44 : http://code.google.com/p/apwidgets/ */
/*------------------------------------------------------------------------------ IMPORT statements required for this sketch -----------------------------------------------------------------------------*/ import android.content.BroadcastReceiver; import android.content.Context; import android.content.Intent; import android.content.IntentFilter;
/*------------------------------------------------------------------------------ GLOBAL Variables to be used between a number of classes. -----------------------------------------------------------------------------*/ publicint[] bg={0,80,0}; public BluetoothDevice btShield = null; public BluetoothSocket btSocket = null; public OutputStream btOutputStream = null; public APWidgetContainer widgetContainer=null; public Connect2BtDevice ConBTdevice=new Connect2BtDevice();
/*------------------------------------------------------------------------------ The following variables are used to setup the Buttons used in the GUI of the phone. It includes the variables that determine the - text on the buttons - the number of buttons - the letters that will be sent to Arduino when the buttons are pressed - the colour that the background will change to when the buttons are pressed - the dimensions of the buttons (width and height) - The gap between each button -----------------------------------------------------------------------------*/ String[] buttonText = { "RED", "GREEN", "BLUE", "OFF"}; //Button Labels String[] sendLetter={"r","g","b","x"}; //Letters to send when button pressed int n= buttonText.length; //Number of buttons int[][] buttonColour = { {255,10,10}, {10,255,10}, {10,10,255}, {0,0,0} }; //The Background colour on phone when button pressed
APButton[] guiBtns = new APButton[n]; //Array of buttons int gap=10; //gap between buttons int buttonWidth=0; //initialising the variable to hold the WIDTH of each button int buttonHeight=0; //initialising the variable to hold the HEIGHT of each button
/*------------------------------------------------------------------------------ The setup() method is used to connect to the Bluetooth Device, and setup the GUI on the phone. -----------------------------------------------------------------------------*/ void setup(){ new Thread(ConBTdevice).start(); //Connect to SeeedBTSlave device orientation(LANDSCAPE); //Make GUI appear in landscape mode
//Setup the WidgetContainer and work out the size of each button widgetContainer = new APWidgetContainer(this); buttonWidth=((width/n)-(n*(gap/2))); //button width depends on screen width buttonHeight=(height/2); //button height depends on screen height
//Add ALL buttons to the widgetContainer. for(int i=0; i<n;i++){ guiBtns[i]= new APButton(((buttonWidth*i)+(gap*(i+1))), gap, buttonWidth, buttonHeight, buttonText[i]); widgetContainer.addWidget(guiBtns[i]); } }
/*------------------------------------------------------------------------------ The draw() method is only used to change the colour of the phone's background -----------------------------------------------------------------------------*/ void draw(){ background(bg[0],bg[1],bg[2]); }
/*------------------------------------------------------------------------------ onClickWidget is called when a button is clicked/touched, which will change the colour of the background, and send a specific letter to the Arduino. The Arduino will use this letter to change the colour of the RGB LED -----------------------------------------------------------------------------*/ void onClickWidget(APWidget widget){ String letrToSend="";
/*Identify the button that was pressed, Change the phone background colout accordingly and choose the letter to send */ for(int i=0; i<n;i++){ if(widget==guiBtns[i]){ ConBTdevice.changeBackground(buttonColour[i][0], buttonColour[i][1], buttonColour[i][2]); letrToSend=sendLetter[i]; } }
/* Send the chosen letter to the Arduino/Bluetooth Shield */ if(ConBTdevice!=null){ ConBTdevice.write(letrToSend); } }
/*============================================================================== CLASS: Connect2BtDevice implements Runnable - used to connect to remote bluetooth device and send values to the Arduino ==================================================================================*/ publicclassConnect2BtDevice implements Runnable{
/*------------------------------------------------------------------------------ DEFAULT CONSTRUCTOR: Connect2BtDevice() - Create a BroadcastReceiver (registered in run() method). - Get the default Bluetooth Adapter - Enable the adapter (if it is not already enabled). - Discover available Bluetooth devices to connect to -----------------------------------------------------------------------------*/ public Connect2BtDevice(){ broadcastBtDevices = new btBroadcastReceiver(); getBtAdapter(); enableBtAdapter(); discoverBtDevices(); }
/*------------------------------------------------------------------------------ run() method - used to register the broadcast receiver only -----------------------------------------------------------------------------*/ @Override publicvoid run() { registerReceiver(broadcastBtDevices, new IntentFilter(BluetoothDevice.ACTION_FOUND)); }
/*------------------------------------------------------------------------------ getBtAdapter() method - get the default Bluetooth adapter -----------------------------------------------------------------------------*/ void getBtAdapter(){ btAdapter = BluetoothAdapter.getDefaultAdapter(); }
/*------------------------------------------------------------------------------ enableBtAdapter() method - Enable the default Bluetooth Adapter if it isn't already enabled -----------------------------------------------------------------------------*/ void enableBtAdapter(){ if (!btAdapter.isEnabled()) { btAdapter.enable(); } }
/*------------------------------------------------------------------------------ discoverBtDevices() method - Discover other Bluetooth devices within range (ie SeeedBTSlave device) -----------------------------------------------------------------------------*/ void discoverBtDevices(){ while(!btAdapter.isEnabled()){ //Wait until the Bluetooth Adapter is enabled before continuing } if (!btAdapter.isDiscovering()){ btAdapter.startDiscovery(); } }
/*------------------------------------------------------------------------------ connect2Bt() method: called by the btBroadcastReceiver - Create a BluetoothSocket with the discovered Bluetooth device - Change background to yellow at this step - Connect to the discovered Bluetooth device through the BluetoothSocket - Wait until socket connects then - Attach an outputStream to the BluetoothSocket to communicate with Bluetooth device. (ie. Bluetooth Shield on the the Arduino) - Write a "g" string through the outputStream to change the colour of the LED to green and change the phone background colour to green also. A green screen and green LED suggests a successful connection, plus the Bluetooth shield's onboard LED starts flashing green slowly (1 per second), which also confirms the successful connection. -----------------------------------------------------------------------------*/ void connect2Bt(){ try{ btSocket = btShield.createRfcommSocketToServiceRecord(uuid); changeBackground(255,255,0); //YELLOW Background try{ btSocket.connect(); while(btSocket==null){ //Do nothing } try { btOutputStream = btSocket.getOutputStream(); changeBackground(0,255,0); //Green Background write("g"); //Green LED (Successful connection) }catch (IOException e) { Log.e("ConnectToBluetooth", "Error when getting output Stream"); } }catch(IOException e){ Log.e("ConnectToBluetooth", "Error with Socket Connection"); changeBackground(255,0,0); //Red background } }catch(IOException e){ Log.e("ConnectToBluetooth", "Error with Socket Creation"); changeBackground(255,0,0); //Red background try{ btSocket.close(); //try to close the socket }catch(IOException closeException){ Log.e("ConnectToBluetooth", "Error Closing socket"); }return; } }
/*------------------------------------------------------------------------------ write(String str) method - Allows you to write a String to the remote Bluetooth Device -----------------------------------------------------------------------------*/ publicvoid write(String str) { try { btOutputStream.write(stringToBytes(str)); } catch (IOException e) { Log.e("Writing to Stream", "Error when writing to btOutputStream"); } }
/*------------------------------------------------------------------------------ byte[] stringToBytes(String str) method - Used by the write() method - This method is used to convert a String to a byte[] array - This code snippet is from Byron: http://www.javacodegeeks.com/2010/11/java-best-practices-char-to-byte-and.html -----------------------------------------------------------------------------*/ public byte[] stringToBytes(String str) { char[] buffer = str.toCharArray(); byte[] b = new byte[buffer.length << 1]; for(int i = 0; i < buffer.length; i++) { int bpos = i << 1; b[bpos] = (byte) ((buffer[i]&0xFF00)>>8); b[bpos + 1] = (byte) (buffer[i]&0x00FF); } return b; }
/*------------------------------------------------------------------------------ cancel() method - Can be called to close the Bluetooth Socket -----------------------------------------------------------------------------*/ publicvoid cancel() { try { btSocket.close(); } catch (IOException e){ } }
/*------------------------------------------------------------------------------ changeBackground(int bg0, int bg1, int bg2) method - A method to change the background colour of the phone screen -----------------------------------------------------------------------------*/ void changeBackground(int bg0, int bg1, int bg2){ bg[0] = bg0; bg[1] = bg1; bg[2] = bg2; } }
/*============================================================================== CLASS: btBroadcastReceiver extends BroadcastReceiver - Broadcasts a notification when the "SeeedBTSlave" is discovered/found. - Use this notification as a trigger to connect to the remote Bluetooth device ==================================================================================*/ publicclassbtBroadcastReceiver extends BroadcastReceiver { @Override publicvoid onReceive(Context context, Intent intent) { String action=intent.getAction(); /* Notification that BluetoothDevice is FOUND */ if(BluetoothDevice.ACTION_FOUND.equals(action)){ /* Get the discovered device Name */ String discoveredDeviceName = intent.getStringExtra(BluetoothDevice.EXTRA_NAME);
/* If the discovered Bluetooth device Name =SeeedBTSlave then CONNECT */ if(discoveredDeviceName.equals("SeeedBTSlave")){ /* Get a handle on the discovered device */ btShield = intent.getParcelableExtra(BluetoothDevice.EXTRA_DEVICE); /* Connect to the discovered device. */ ConBTdevice.connect2Bt(); } } } }
Here is a picture of the components used in this sketch:
Please take notice of the Jumper pin placement on the Bluetooth Shield. This ensures communication between the Arduino and Bluetooth Shield, and is reflected in the Arduino code further down this page. The Arduino transmits information to the Bluetooth Shield on Digital pin 7, and therefore the Bluetooth Shield receivesinformation from the Arduino on Digital pin 7. On the other hand, the Bluetooth shield transmits and the Arduino receives information on Digital pin 6 (see picture below). This serial communication between the Arduino and the Bluetooth Shield occurs through the SoftwareSeriallibrary. This is different from the Serial library used in some of my other tutorials (often to display information in the Serial Monitor). The Arduino UNO's Serial pins are 0 (RX) and 1 (TX). It is worth looking at the Arduino Serialpage if you happen to have an Arduino Leonardo, because there are some differences that you should take into consideration when running this sketch.
Make sure that your Arduino has the following code installed and running BEFORE you launch the Android/Processing Sketch on your Android Device. If you don't do it in this order, your Android phone will not discover the Bluetooth Device attached to the Arduino, and you will waste a lot of time. Make sure that the Bluetooth shield is flashing it's red/green LEDs. Once you see this alternating red/green LED display, launch the Android/Processing sketch on the Android device. When you see the chainable RGB LED turn from white to green, you know you have a successful connection. You may then press the GUI buttons on the Android phone to change the colour of the LED to either Red, Green, Blue or Off.
Arduino Sketch 3: Bluetooth RGB Colour Changer (with OFF option)
/* This project combines the code from a few different sources. This project was put together by ScottC on the 15/01/2013 http://arduinobasics.blogspot.com/
Bluetooth slave code by Steve Chang - downloaded from : http://www.seeedstudio.com/wiki/index.php?title=Bluetooth_Shield
Grove Chainable RGB code can be found here : http://www.seeedstudio.com/wiki/Grove_-_Chainable_RGB_LED#Introduction
Updated on 25 March 2013: Receive 'x' to turn off RGB LED.
*/
#include <SoftwareSerial.h> //Software Serial Port
#define RxD 6 // This is the pin that the Bluetooth (BT_TX) will transmit to the Arduino (RxD) #define TxD 7 // This is the pin that the Bluetooth (BT_RX) will receive from the Arduino (TxD)
#define DEBUG_ENABLED 1
int Clkpin = 9; //RGB LED Clock Pin (Digital 9) int Datapin = 8; //RGB LED Data Pin (Digital 8)
SoftwareSerial blueToothSerial(RxD,TxD); /*----------------------SETUP----------------------------*/void setup() { Serial.begin(9600); // Allow Serial communication via USB cable to computer (if required) pinMode(RxD, INPUT); // Setup the Arduino to receive INPUT from the bluetooth shield on Digital Pin 6 pinMode(TxD, OUTPUT); // Setup the Arduino to send data (OUTPUT) to the bluetooth shield on Digital Pin 7 pinMode(13,OUTPUT); // Use onboard LED if required. setupBlueToothConnection(); //Used to initialise the Bluetooth shield
pinMode(Datapin, OUTPUT); // Setup the RGB LED Data Pin pinMode(Clkpin, OUTPUT); // Setup the RGB LED Clock pin
} /*----------------------LOOP----------------------------*/void loop() { digitalWrite(13,LOW); //Turn off the onboard Arduino LED char recvChar; while(1){ if(blueToothSerial.available()){//check if there's any data sent from the remote bluetooth shield recvChar = blueToothSerial.read(); Serial.print(recvChar); // Print the character received to the Serial Monitor (if required)
//If the character received = 'r' , then change the RGB led to display a RED colour if(recvChar=='r'){ Send32Zero(); // begin DataDealWithAndSend(255, 0, 0); // first node data Send32Zero(); // send to update data }
//If the character received = 'g' , then change the RGB led to display a GREEN colour if(recvChar=='g'){ Send32Zero(); // begin DataDealWithAndSend(0, 255, 0); // first node data Send32Zero(); // send to update data }
//If the character received = 'b' , then change the RGB led to display a BLUE colour if(recvChar=='b'){ Send32Zero(); // begin DataDealWithAndSend(0, 0, 255); // first node data Send32Zero(); // send to update data }
//If the character received = 'x' , then turn RGB led OFF if(recvChar=='x'){ Send32Zero(); // begin DataDealWithAndSend(0, 0, 0); // first node data Send32Zero(); // send to update data } }
//You can use the following code to deal with any information coming from the Computer (serial monitor) if(Serial.available()){ recvChar = Serial.read();
//This will send value obtained (recvChar) to the phone. The value will be displayed on the phone. blueToothSerial.print(recvChar); } } }
//The following code is necessary to setup the bluetooth shield ------copy and paste---------------- void setupBlueToothConnection() { blueToothSerial.begin(38400); //Set BluetoothBee BaudRate to default baud rate 38400 blueToothSerial.print("\r\n+STWMOD=0\r\n"); //set the bluetooth work in slave mode blueToothSerial.print("\r\n+STNA=SeeedBTSlave\r\n"); //set the bluetooth name as "SeeedBTSlave" blueToothSerial.print("\r\n+STOAUT=1\r\n"); // Permit Paired device to connect me blueToothSerial.print("\r\n+STAUTO=0\r\n"); // Auto-connection should be forbidden here delay(2000); // This delay is required. blueToothSerial.print("\r\n+INQ=1\r\n"); //make the slave bluetooth inquirable Serial.println("The slave bluetooth is inquirable!"); delay(2000); // This delay is required. blueToothSerial.flush(); }
//The following code snippets are used update the colour of the RGB LED-----copy and paste------------ void ClkProduce(void){ digitalWrite(Clkpin, LOW); delayMicroseconds(20); digitalWrite(Clkpin, HIGH); delayMicroseconds(20); } void Send32Zero(void){ unsignedchar i; for (i=0; i<32; i++){ digitalWrite(Datapin, LOW); ClkProduce(); } }
Please note that this Arduino code/project will work with SeeedStudio's Bluetooth Shield. You may need to modify the Arduino Code (lines 95-107) to coincide with your own bluetooth shield. I got the code snippet within the my setupBlueToothConnection() method from some example code from Steve Chang which was found on SeeedStudio's Bluetooth Shield Wiki page. Here is some other useful information in relation to setting up this Bluetooth Shield that could be of help in your project (here).
Much of the code used within the Android/Processing sketch was made possible through constant reference to these sites:
And I would also like to thank Pauline303 who made the suggestion within the Processing Forums to use APWidgets Library for my Buttons in the App. The Arduino and Processing Forums are always a great place to get help in a short amount of time.


No comments:
Post a Comment