It is sometimes useful to be able to view the code that your Arduino has to execute, for example the two lines of C code A++; and B++; could result in code that is upto 6 times longer when A is a global integer and B is a local byte.
This approach has been confirmed to work with Arduino Due code also - some of the file and directory names will be different, see the screen shot at the end of the post - follow these steps to easily get the assembly output.
Step By Step Guide To Viewing Arduino Assembler
Here is a simple set of steps you can use to view your source code and the corresponding assembly generated by the compiler -
1) Turn on verbose output
Start the Arduino editor and from the File menu select Preferences to display the screen shown below. Find and select the option to 'Show verbose output during;' and tick the 'compilation' check box.
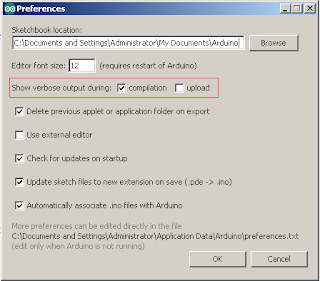 With this option selected, the Editor will show a trace of each step of the compilation process, it does not change anything within the process, it just displays the commands that the IDE issues to compile and upload your sketch. This can be useful to know especially if you would like to try alternative editors or you are having problems uploading to a new target.
2) Compile your sketch
As the sketch compiles, you should see the output window at the bottom of the editor filling up with a series of commands being issued by the editor. Once the process has completed and the status bar shows 'Done Uploading' your sketch has been successfully compiled.
3) Find the ELF file
One of the last commands displayed in the output window will be avr-objcopy targetting a .elf file for your sketch. Find this command in your output window, select and copy the whole command.
 The quickest way to do this is to use the mouse to highlight the line and then use the keyboard short cut for copy 'CTRL C' on windows machines.
If you are using an ARM Based Arduino (Arduino Due), the structure will be the same with some difference in the command lines - the procedure is the same so read on.
4) Open a command prompt.
Open a command prompt. In windows you can simply type cmd into start/run. With the command prompt open, paste the command we copied in 3 into the command prompt - we will edit this command in the next step so do not run it yet. If you are struggling to paste the command line, you can try the keyboard short cut 'CTRL V' or right click and access the Paste option from the context menu or you can also access Paste from the Edit section of window menu accessed through the icon in the top left of the window.
5) Replace avr-objcopy with avr-objdump
The command is formed in three parts, the command itself, one or more options and then finally the target file. The target file is correct, but we need to change the command and replace the options. To change the command, move the cursor back to the command avr-objcopy and change it to read avr-objdump, this is the program that is able to generate a file containing our original source code combined with the corresponding assembly code generated by the compiler.
6) Replace the options
Because we have changed the program we are running against our target file, we must also change the options. To do this remove everything between the end of the obj-dump command and the start of the path to our target file and replace this with -S.
7) Add an output file
If we run the command at this point the output will go to the screen, its far more useful for us to have the output sent to a file. We can use the file to compare the effect of any future changes or just to open in an editor for easier reading. To do this we add the redirect symbol and a file name, this will redirect the output from the screen to the filename we provide. In the case of windows, the final command will appear as follows -
Additions in bold
C:\arduino-1.0-windows\arduino-1.0\hardware\tools\avr\bin\avr-objdump -S C:\DOCUME~1\ADMINI~1\LOCALS~1\Temp\build8468877697114637985.tmp\RCChannelsL293D.cpp.elf > RCChannels.dmp
We can now open RCChannels.dmp in our chosen editor to view the assembly generated by each line of our source code. You should see your original source code and a line by line dump of the corresponding assembler.
If you really want to know what each line is doing you can refer to the AVR Instruction set - http://www.atmel.com/images/doc0856.pdf
In general I find a scan through the assembly is useful when checking out what library functions are being included and what they are doing. It also interesting to see how the compiler is optimizing your C code, you will often find code within functions can be reordered, whole functions will be inlined and you may even find one or two sections of code will optimized away completely.
The end result for me is that I tend to focus on writting C code that is as readable and maintainable as possible and that I am happy to let the compiler do the optimizing.
In a later post I will cover a few of the techniques which I have used to optimize the Illutron B Synthesizer code.
Stay Tuned
Duane B
This approach has been confirmed to work with Arduino Due code also - some of the file and directory names will be different, see the screen shot at the end of the post - follow these steps to easily get the assembly output.
Step By Step Guide To Viewing Arduino Assembler
Here is a simple set of steps you can use to view your source code and the corresponding assembly generated by the compiler -
1) Turn on verbose output
Start the Arduino editor and from the File menu select Preferences to display the screen shown below. Find and select the option to 'Show verbose output during;' and tick the 'compilation' check box.

2) Compile your sketch
As the sketch compiles, you should see the output window at the bottom of the editor filling up with a series of commands being issued by the editor. Once the process has completed and the status bar shows 'Done Uploading' your sketch has been successfully compiled.
3) Find the ELF file
One of the last commands displayed in the output window will be avr-objcopy targetting a .elf file for your sketch. Find this command in your output window, select and copy the whole command.

If you are using an ARM Based Arduino (Arduino Due), the structure will be the same with some difference in the command lines - the procedure is the same so read on.
4) Open a command prompt.
Open a command prompt. In windows you can simply type cmd into start/run. With the command prompt open, paste the command we copied in 3 into the command prompt - we will edit this command in the next step so do not run it yet. If you are struggling to paste the command line, you can try the keyboard short cut 'CTRL V' or right click and access the Paste option from the context menu or you can also access Paste from the Edit section of window menu accessed through the icon in the top left of the window.
5) Replace avr-objcopy with avr-objdump
The command is formed in three parts, the command itself, one or more options and then finally the target file. The target file is correct, but we need to change the command and replace the options. To change the command, move the cursor back to the command avr-objcopy and change it to read avr-objdump, this is the program that is able to generate a file containing our original source code combined with the corresponding assembly code generated by the compiler.
6) Replace the options
Because we have changed the program we are running against our target file, we must also change the options. To do this remove everything between the end of the obj-dump command and the start of the path to our target file and replace this with -S.
In the case of my example sketch -
Change this:
C:\arduino-1.0-windows\arduino-1.0\hardware\tools\avr\bin\avr-objcopy -O ihex -R .eeprom C:\DOCUME~1\ADMINI~1\LOCALS~1\Temp\build8468877697114637985.tmp\RCChannelsL293D.cpp.elf
To this: (changes in bold)
C:\arduino-1.0-windows\arduino-1.0\hardware\tools\avr\bin\avr-objdump -S C:\DOCUME~1\ADMINI~1\LOCALS~1\Temp\build8468877697114637985.tmp\RCChannelsL293D.cpp.elf
On Arduino DUE
Change this:
C:\arduino-1.5.1r2/hardware/tools/g++_arm_none_eabi/bin/arm-none-eabi-objcopy -O binary C:\DOCUME~1\ADMINI~1\LOCALS~1\Temp\build5072018496906827174.tmp/sketch_nov21a.cpp.elf
To This
C:\arduino-1.5.1r2/hardware/tools/g++_arm_none_eabi/bin/arm-none-eabi-objdump -S C:\DOCUME~1\ADMINI~1\LOCALS~1\Temp\build5072018496906827174.tmp/sketch_nov21a.cpp.elf
Change this:
C:\arduino-1.0-windows\arduino-1.0\hardware\tools\avr\bin\avr-objcopy -O ihex -R .eeprom C:\DOCUME~1\ADMINI~1\LOCALS~1\Temp\build8468877697114637985.tmp\RCChannelsL293D.cpp.elf
To this: (changes in bold)
C:\arduino-1.0-windows\arduino-1.0\hardware\tools\avr\bin\avr-objdump -S C:\DOCUME~1\ADMINI~1\LOCALS~1\Temp\build8468877697114637985.tmp\RCChannelsL293D.cpp.elf
On Arduino DUE
Change this:
C:\arduino-1.5.1r2/hardware/tools/g++_arm_none_eabi/bin/arm-none-eabi-objcopy -O binary C:\DOCUME~1\ADMINI~1\LOCALS~1\Temp\build5072018496906827174.tmp/sketch_nov21a.cpp.elf
To This
C:\arduino-1.5.1r2/hardware/tools/g++_arm_none_eabi/bin/arm-none-eabi-objdump -S C:\DOCUME~1\ADMINI~1\LOCALS~1\Temp\build5072018496906827174.tmp/sketch_nov21a.cpp.elf
7) Add an output file
If we run the command at this point the output will go to the screen, its far more useful for us to have the output sent to a file. We can use the file to compare the effect of any future changes or just to open in an editor for easier reading. To do this we add the redirect symbol and a file name, this will redirect the output from the screen to the filename we provide. In the case of windows, the final command will appear as follows -
Additions in bold
C:\arduino-1.0-windows\arduino-1.0\hardware\tools\avr\bin\avr-objdump -S C:\DOCUME~1\ADMINI~1\LOCALS~1\Temp\build8468877697114637985.tmp\RCChannelsL293D.cpp.elf > RCChannels.dmp
While it may look like a lot of steps, if we show the end result, its actually very simple -
All changes from original text supplied by the Arduino editor are highlighted in bold
C:\arduino-1.0-windows\arduino-1.0\hardware\tools\avr\bin\avr-objdump -S C:\DOCUME~1\ADMINI~1\LOCALS~1\Temp\build8468877697114637985.tmp\RCChannelsL293D.cpp.elf > RCChannels.dmp
Arduino Due Example (different sketch, same process) -
C:\arduino-1.5.1r2/hardware/tools/g++_arm_none_eabi/bin/arm-none-eabi-objcopy -O binary C:\DOCUME~1\ADMINI~1\LOCALS~1\Temp\build5072018496906827174.tmp/sketch_nov21a.cpp.elf > MyDumpFile.txt
We can now open RCChannels.dmp in our chosen editor to view the assembly generated by each line of our source code. You should see your original source code and a line by line dump of the corresponding assembler.
A Small section of the RCChannelsL293D sketch showing C Code and resulting assembly code generated by the compiler -
void readSettingsFromEEPROM()
{
unSteeringMin = readChannelSetting(EEPROM_INDEX_STEERING_MIN);
26e: 80 e0 ldi r24, 0x00 ; 0
270: 0e 94 ac 00 call 0x158 ; 0x158 <_Z18readChannelSettingh>
274: 90 93 11 01 sts 0x0111, r25
278: 80 93 10 01 sts 0x0110, r24
if(unSteeringMin < RC_MIN || unSteeringMin > RC_NEUTRAL)
27c: 88 5e subi r24, 0xE8 ; 232
27e: 93 40 sbci r25, 0x03 ; 3
280: 85 5f subi r24, 0xF5 ; 245
282: 91 40 sbci r25, 0x01 ; 1
284: 30 f0 brcs .+12 ; 0x292 <_Z22readSettingsFromEEPROMv+0x24>
{
unSteeringMin = RC_MIN;
286: 88 ee ldi r24, 0xE8 ; 232
288: 93 e0 ldi r25, 0x03 ; 3
28a: 90 93 11 01 sts 0x0111, r25
28e: 80 93 10 01 sts 0x0110, r24
}
Serial.println(unSteeringMin);
292: 60 91 10 01 lds r22, 0x0110
296: 70 91 11 01 lds r23, 0x0111
29a: 8f ed ldi r24, 0xDF ; 223
29c: 91 e0 ldi r25, 0x01 ; 1
29e: 4a e0 ldi r20, 0x0A ; 10
2a0: 50 e0 ldi r21, 0x00 ; 0
2a2: 0e 94 be 0a call 0x157c ; 0x157c <_ZN5Print7printlnEji>
If you really want to know what each line is doing you can refer to the AVR Instruction set - http://www.atmel.com/images/doc0856.pdf
In general I find a scan through the assembly is useful when checking out what library functions are being included and what they are doing. It also interesting to see how the compiler is optimizing your C code, you will often find code within functions can be reordered, whole functions will be inlined and you may even find one or two sections of code will optimized away completely.
The end result for me is that I tend to focus on writting C code that is as readable and maintainable as possible and that I am happy to let the compiler do the optimizing.
For those rare cases where you really do need to save every last 0.0000000625 of a second ATMEL produce some guidelines on constructing your C code for best performance -
http://www.atmel.com/Images/doc8453.pdf
As most 8-bit micro controllers operate in a similar manner, you can also refer to any embedded system optimization techniques and general C/C++ optimization techniques.
http://www.atmel.com/Images/doc8453.pdf
As most 8-bit micro controllers operate in a similar manner, you can also refer to any embedded system optimization techniques and general C/C++ optimization techniques.
In a later post I will cover a few of the techniques which I have used to optimize the Illutron B Synthesizer code.
Stay Tuned
Duane B
No comments:
Post a Comment