Sunday, March 13, 2016

Driving the #Bolt at #ilightsmarinabay using I2C protocol


#Bolt #SVTmaker


In this article, I would like to share my experience in planning, testing, making, building, and driving the #Bolt at #ilightsmarinabay that happened on 4th March 2016 at Marina Bay, Singapore iLights festival.

A local artists that built a massive LED star in Butterworth, Penang called Jun Hao engaged two local makers, WeMaker and SVTmaker to do another project in Singapore called the Bolt, simulating lightning bolt when a button was pressed. The below images was taken from his proposal to the festival.

Bolt idea and concept

After understanding the requirements from the artists, we started exploring various way to drive the LED strips, from simple relays with delays to wireless options. After a few weeks of searches, I finally found an ideal method to drive so many LEDs using Inter-Integrated Circuit (I2C) protocol with 1 I2C master driving 8 I2C slaves. The idea was to use the delay() to turn on and off the LED strips.

The idea was to have eight passive I2C slaves just receiving commands from the I2C master and all my coding would be centralized in the I2C master. This makes controlling the code version easily and any changes does not need to re-flash all the 8 I2C slaves. This was my first time writing my own protocols on top of I2C and I probably would exceed the maximum length of the I2C wiring distance.

MOSFET on breadboard
Driving 2 Arduino via I2C 


The next task was finding a way to drive the 1 meter 12V LED strips and we decided on using MOSFET for this purpose. This was my first time using MOSFET and lots of it, around 80 pieces of MOSFET to drive around 80 pieces of 1m LED strips.

Bolt PCB circuit

Once this test was done, the next step was making a custom PCB for this purpose as soldering 12 LED strips to 8 I2C slaves on a prefboard is not fun at all. With my very limited skills in EagleCAD, I started drawing up the schematic diagram and board drawing  using 12 MOSFET driven by 12 pins on the Arduino Nano.

I usually take weeks and many many revisions to correct many errors before I make them into an actual PCB but this time around, time was not on my side and after 3 revisions within 2 days, I send it to Uncle Chow, 9M2CF to get the PCB done. Just in case the I2C does not work, I added a circuit to use nRF wireless options into the circuit as a backup plan. Always have backup plans.

Film of PCB drawing 
Bolt PCB done in 2 days
 To improve the quality of the PCB traces, uncle Chow 9M2CF, made a film instead of printing the drawing on tracing paper with laser printer.


Meanwhile doing the PCB, the architecture students from Taylors quickly did a model of the structure using lollipop sticks and lots of hot glue. A lot of work was put into making the frosted tubes while cut and soldered long wires to the 1 meter LED strips.

Driving the Led with Eduboard


After fixing many circuit errors on the PCB, it was time to hook it up to the model structure to test the lightning patterns. Referring to the first picture of the actual structure, the model accurately show how it will actually going to look like at night with the LED turned on.

I find that we actually did this project twice, once on the model and again on the actual structure as we had mini 3 LED strips hook up to the 8 I2C slaves.

8 I2C slaves fully soldered

8 I2C slaves hook up to the model structure

Continue on the next article where I talk more on how to drive the LED using a master I2C ....

Summary Links :-


Tuesday, December 15, 2015

Circuit Diagram

I just came across this site today (www.schematics.com).It looks pretty impressive !!
Schematics.com allows you to "build, share and view schematics from you browser"
You can also embed your schematic creations on your website - which is neat.


  Circuit Diagram - Schematics is the language of electronics. It provides a concise and comprehensive diagrammatic description of a circuit. Schematics.com allows users to connect and share designs and ideas in a like-minded community.


Monday, November 16, 2015

Get Arduino Data over the internet using jQuery and AJAX

Description

Have you ever wanted to transmit Arduino data over the internet?

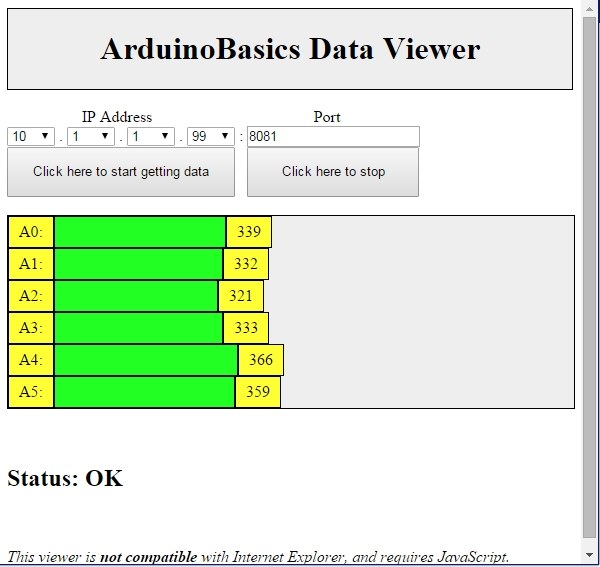
In this tutorial, we will design a web page that will retrieve Analog readings from the Arduino's Analog Pins and display them on a bar chart within the web page.

The web page will use jQuery and AJAX to request the data from the Arduino Web Server, allowing us to update the bar chart dynamically, without having to refresh the entire web page. The Arduino Web Server will send the Analog readings to the web page in JSON format where it will be processed and displayed accordingly.

In this tutorial, I will not have anything connected to the Arduino's Analog pins, which means the data retrieved will be that of randomly floating analog pins. Feel free to connect a potentiometer, temperature sensor or any other analog sensor to these pins if you want to create a more "useful" project.

The main aim here was to show you how to transmit the data in JSON format, and to update only a portion of the web page using asynchronous communication (using AJAX), to improve the performance of data retrieval and visualisation.


Parts Required:

Please note: The WIZnet ioShield-A ver1.1 actually comes with the WIZ550io board. So if you buy the ioShield-A, you will receive both boards. I have provided the link to the WIZ550io shield because you can buy that shield on its own. Regardless, you will need to use both boards for this tutorial.


Arduino Libraries and IDE

To program the Arduino you will need to download the Arduino IDE, and install the WIZnet Ethernet Library. The Arduino IDE version used in this tutorial was version 1.6.4.
You may want to read the WIZnet wiki information for each WIZnet shield before use.


ARDUINO CODE:

Full description of the Arduino code is included in the YouTube video above. Once you have set up your Arduino Web Server, you should be able to ping it. Look at this website, if you don't know how to use the windows ping feature.


Getting the Arduino Board onto the internet:

There isn't anything really to hook up for this project. You just have to align the pins for each board and stack them. You can power the Arduino via the USB cable. This will also be useful for debugging and printing to the Serial monitor. An ethernet cable needs to connect the WIZ550io board's ethernet port to your internet/network router

  • The WIZ550io board goes on the top
WIZ550io Shield

  • The ioShield-A is in the middle
WIZnet ioShield-A ver 1.1

  • The Arduino UNO is on the bottom
Arduino UNO

  • This is what it looks like when they are stacked together
Arduino UNO plus ioShield-A plus WIZ550io shield

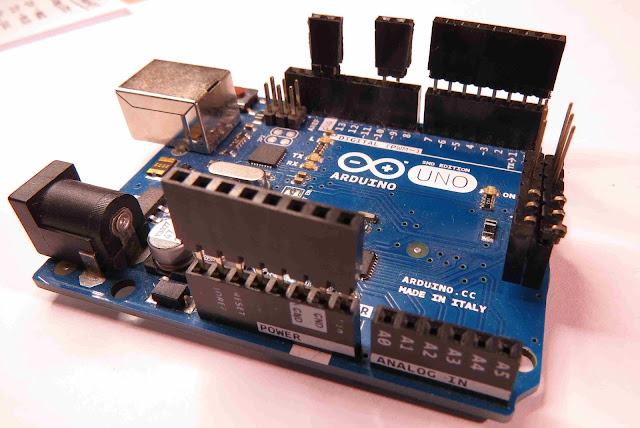
  • If you want to gain easy access to the Analog or digital pins without de-soldering the ioShield-A, you can introduce some female headers like this:
Arduino UNO with some extra Female headers

  • Please note that the ioShield-A utilises a number of pins on the Arduino UNO - including: D2, D4, D7, D10, GND, and IOREF, RESET, 5V, GND, GND and ICSP pins
  • All Analog pins are available for use


Set the Arduino Web Server on your local network

You can test this project on your local network. You just have to choose an available IP address and PORT within your router's IP range. If you don't know your local IP address range - you can have a look at this site to give you a helping hand.


Set the Arduino Web Server to be accessed from anywhere in the world

If you want to access your Arduino from anywhere in the world, you need to set up Port Forwarding on your internet network router. The following useful guides will hopefully get you on the right track, if you have never set up Port forwarding.


In my case, I programmed the Arduino UNO Web Server to take the following ip address on my internal network: 10.1.1.99

I programmed the Arduino Web Server to listen for Web Browsers on port 8081.
So if I wanted to connect to the Arduino Web Server through my home network, I just had to type in this web address into my web browser: http://10.1.1.99:8081

If you plan to connect to the Arduino using port 80 (which is the default port for web browsers), you can just type the IP address without specifying the port (eg. http://10.1.1.99/ )

The web browser should display the Arduino data in JSON format (the YouTube video above will show you what that looks like).

Once I knew I could connect to the Arduino in my internal network, I then set up port forwarding on my router so that I could type in my external IP address and special port to tunnel my way into my Arduino Web Server on my internal network. This is what I had to do on my router, but you may need to do something different.

  1. My first step was to find out my public/external IP address by typing "what is my IP address" into google. If you want to know your external IP address click here.
  2. I then typed my router's ip address into a web browser, and logged into my router.
  3. I went to the advanced settings tab
  4. Selected "Port Forwarding" from the side menu
  5. Filled out all of the details on the first line of the Ports list
    • Enable box = ticked
    • Description = Arduino
    • WAN interface = pppoe_atm0/ppp0
    • Inbound port = 8082
    • Type = TCP
    • Private IP address = 10.1.1.99
    • Private port = 8081
  6. Saved the settings

Now that I had port forwarding enabled, I could type the ip address (that I obtained in step 1) into my browser and specified port 8082 (instead of 8081) - eg. http://190.11.70.253:8082/

And now I can access my Arduino Web server from anywhere in the world. I can even access it from my smart phone. Once again, this will only return the Analog data in JSON format.


The Web Page GUI

The Arduino is now on the internet, so there are two options. You can either

Instructions on how to use these web pages, are listed below the HTML code.


To retrieve data from your Arduino Web Server, please make sure that it is connected and visible from outside of you local network. You will need to have port forwarding enabled. Information on port forwarding is described above.

  1. Find what your external IP address is.
  2. Enter this address using the IP address drop-down boxes within the "ArduinoBasics Webserver Data viewer" web page
  3. Enter the port forwarding port number (eg. 8082) into the box labelled "Port"
  4. Then click on the "Click here to start getting data" button - you should start to see the bar charts moving and status should be OK
  5. If the bar charts do not move, and the status message says "Failed to get DATA!!" - then the web page was unable to connect to the Arduino for some reason.


ArduinoBasics Web Data Viewer Web Page Example

Troubleshooting

  • You may want to type in the web address into your web browser, to make sure that data is being retrieved.
  • You can also open the Serial monitor in the Arduino IDE to make sure that an IP address is being displayed
  • Ensure that you have enabled the port forwarding option on your router
  • Have a look at Developer Tools within Google Chrome to help diagnose web page related issues.
  • The web page will not work properly if you use Internet Explorer or if you have javascript disabled within your browser.

Concluding comments

This tutorial showed you how to connect to your Arduino UNO over the internet, and retrieve data in JSON format using jQuery and AJAX. The web page can be modified to suit your own needs, plus it would be more useful if the Arduino was actually monitoring something, rather than logging data from floating pins. It would also be useful if the Arduino could be controlled to blink an LED, or to turn a motor... but I will leave that project for another day. I hope you enjoyed this tutorial - if it helped you in any way, please consider donating a small "tip" into my money jar. Thank you.


If you like this page, please do me a favour and show your appreciation :

 
Visit my ArduinoBasics Google + page.
Follow me on Twitter by looking for ScottC @ArduinoBasics.
I can also be found on Pinterest and Instagram.
Have a look at my videos on my YouTube channel.


However, if you do not have a google profile...
Feel free to share this page with your friends in any way you see fit.